Preparing Batch Uploads
Throughout this guide this file is being used for creating a transaction batch CSV file.
Preparing data
Open the template file in Excel. You should be presented with something that looks like the image below:
You will notice that the first column is a list of column headers indicating what data should be provided in the fields below. Anywhere it says IGNORE, you can simply leave that column blank.
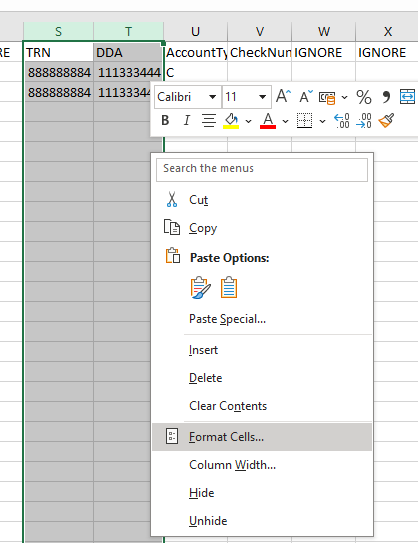
IMPORTANT: Fields S and T are the routing and account number field. It is very important that the data you put in this field matches what your customer provides.
In order to accomplish this, you should highlight both columns and then right click and select the “Format Cells” option.
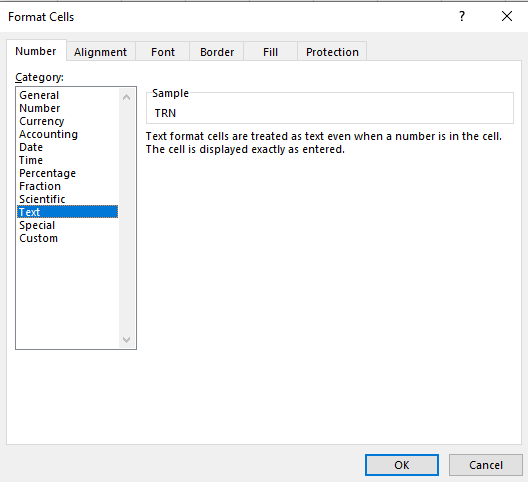
You will be presented with the following dialog menu to select the format of the fields.
By default, all columns are formatted as General. You should select “Text” as it is shown in the above screenshot. And click OK.
For any bank account and routing numbers that have leading zeros, you should now see a green triangle on the upper left hand side of the cell indicating that the data is preserved in that format.
Saving Your Completed File
You will need to save your file as a CSV (Comma Separated Values) file to upload it to your merchant account.
Go to File > Save As (in Excel 2003 and Excel 2016 and later) or Office Button > Save As (in Excel 2007/10)
Using the File type combo box, select CSV (Comma delimited) (*.csv). The File name does not matter in terms of uploading the file to our website. Any naming scheme will work. Make sure you save it to some place easily accessible
Click Save once you’re done there.
You may also be prompted with a message notifying you that there are features not compatible with the CSV format. This is referring to multiple work sheets, certain formatting settings, etc. You should click “Yes” if this message appears.
Close Excel. Excel will ask you if you want to save the changes made. You can click “No” on this box, otherwise, when you save the file, you can save it as an Excel file if you want.
Preparing The File For Upload
You should now have a file saved as a .CSV that you can use to upload to Checkgateway’s site. In order for this file to be valid on our website, we must remove the header row (containing all of the column names). This following walks you through that process
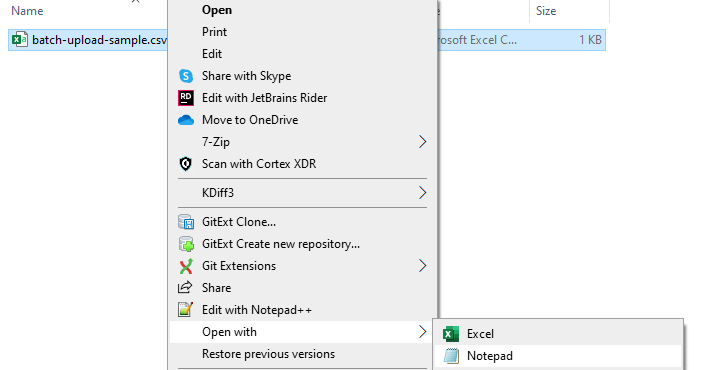
Find the .csv file you saved from Excel earlier and right click it. When the menu appears, choose the “Open With” option. Then choose “choose default program”. From this list, you should see a list of recommended programs. “Notepad” should be somewhere in that list. In the image below on the right, you will see a check box highlighted by a box. Ensure that this box is NOT checked. Choose “notepad” and click OK.
On future attempts, Notepad may appear in the initial open with menu option. You can just select it from there.
You should now see the file in Notepad as shown below. Select the entire top row and simply hit the “backspace” or “delete” key. Then delete the empty row from the top of the file. Your file should look similar to the second screenshot below.
The deliminator that you see in the .csv file might differ from the example as it depends on excel settings. The supported deliminators are semicolon ;, comma , and pipe |
At this point, you will want to save the file. (File > Save or Ctrl+S) You are now ready to upload the file through Merchant Center or through our API.


